Designing your application’s interface: dragging a button into a window.
1. You Must Read This Document!
2.1. Installation Notes
3. The IDE
3.2. Adding Resources to the Project
3.3. Existing Widgets and Objects
3.4. Plug-ins
3.5. The Edit-Run Cycle
4. The Language
4.1. Script and Responder
4.2. Referring to Objects
4.3. Messages
4.4. Constructors and Destructors
4.5. Broadcasts
4.6. FSNotifications
4.7. Operations
5.2. Menu Containment, Menu Ownership, and Menu Dynamism
5.3. Menu Operations
5.4. Menu Item Enablement
6. Responders Without Interface
6.1. Bags
6.2. Timers, Tasks, Etc.
7. Forking
10.1. Tab Order
10.2. User Defaults and Persistence
10.3. Dialogs
10.4. Duplicate
10.5. Simple Table
10.6. Quartz Composition View
10.7. PDF View
10.8. HTML View
10.9. Movie View
10.10. Bonjour Service Browser
10.11. Toolbar Items
10.12. Scrolling Container View
FaceSpan 5 (hereinafter FS5) is in an active, early stage of development. There is no reference documentation. This file is your only introduction to the basic concepts, so it’s essential that you read it. Also, when this document says to see an example, see it! The discussion here is often deliberately brief because the corresponding code example is more expansive and explanatory.
FaceSpan 5 is an application development environment. It is an application that makes applications. The language in which you write the code for these applications is AppleScript. But FS5 enriches that language so that your program will be fully object-based. (Translation: this is not your grandfather’s AppleScript.) The enrichment of AppleScript is implemented transparently by a runtime engine that functions as an application framework.
The FS5 development environment is integrated (it is an “integrated development environment”, an IDE). You design your application’s interface — its windows and the interface objects they contain, such as buttons and text fields — and you provide your application with code, all within the same environment. You edit, run, and debug your code, all within the same environment.
FS5 is not quite like any other IDE you may have used, but if you have used another IDE, your experience will be helpful. So, for example, FS5 is conceptually somewhat like HyperCard or REALbasic (or older versions of FaceSpan).
FS5 is very different from AppleScript Studio — and, for that matter, from FaceSpan 4. It is true that, like them, the FS5 runtime’s application framework mediates between your code and Cocoa. Thus, the applications you write with FS5 are Cocoa applications. However, unlike AppleScript Studio, FS5’s runtime application framework is not a direct reflection of Cocoa, nor is it conceptually or structurally based on Cocoa. The FS5 application framework is completely original, and places a premium on simplicity, clarity, convenience, and power. Think of FaceSpan 5 as a clarified Cocoa (whose language happens to be AppleScript).
FaceSpan 5 looks for four special folders: Clippings, Library, Plug-ins, and Scripts. These can be in the same directory along with the FaceSpan 5 application, or in Library / Application Support / FaceSpan 5. In actual fact they will be in both. FaceSpan 5 keeps its own default material in its own folders, and you can put your added material into Application Support.
A project is basically an FS5 file (actually it’s a folder posing as a file, also known as a bundle), from which you will generate a Cocoa application. The IDE is the entire interface you see when you’re working on a project. Remember, this is not a reference manual, so I’m only going to say enough to make you reasonably comfortable in the IDE. Details will appear in a later document. We expect to make some QuickTime movies that will guide you through the basics of working in the IDE.
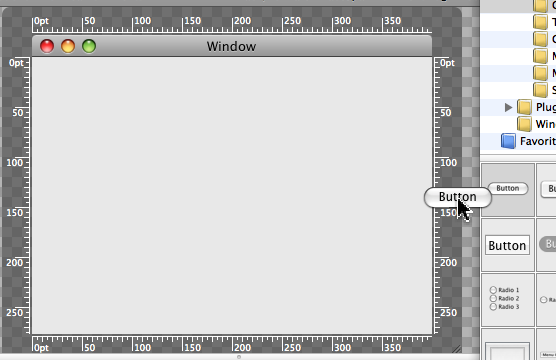
Designing your application’s interface: dragging a button into a window.
There are two ways to make an interface object (which we call a widget), such as a button or a window: you can make it beforehand in the IDE, or you can make it in code when your code runs. So, suppose you want your application to have a main window called “main” with a button in it that says “Click Me”. You could, if you really wanted, make all that happen in code when your app starts up.
But that would be quite unusual. Instead, you are more likely to design the look of your application in the IDE, as in a drawing program. So for example you might start by giving your project a window, sizing it, giving it a title, and dragging a button into it and making it say “Click Me”, all in the IDE.
The truth is that there really isn’t any ultimate difference between these two approaches, because when your app starts up, FaceSpan will use the window(s) you designed in the IDE to issue the very same commands you could have issued in code. But designing in the IDE is a lot easier for most purposes.
See example: 01 HelloWorld. This is the demo minimal “hello, world” application for FS5.
See example: 02 HelloTotallyDynamic. This does exactly the same thing as 01 HelloWorld, except that the entire window and its contents are created dynamically. In real life you would probably never do this, but it is good to understand that it can be done! And creation of some window contents dynamically, in code, is a useful and not uncommon technique.
The IDE consists of four main areas:
The Project Outline. This shows the containment hierarchy of your interface objects (Application Objects). You can actually move interface objects around here, as in an outline (within reason - a window can’t go “inside” a window, for instance). The order of siblings (a button and a text field in a window, for instance) is their “layering” order as they are drawn in their container.
The Canvas. This displays the window selected in the Outline, or the window containing the widget selected in the Outline. This is the “drawing” area where you can design the look of your application’s windows.
The Code. This displays the code for the interface object(s) selected in the Outline or the Canvas.
Note that you can select multiple interface objects and so edit the code for multiple objects simultaneously; this is something you are very likely to want to do, since objects communicate with each other and changes in the code of one can affect changes in the code of others.
A related (and very cool) non-obvious feature is Edit > Select Children With Scripts; this lets you select, automatically, all children of the selected object that actually have code, and see and edit their code, all at once. This is valuable because code may be scattered amongst many widgets in your project, and many other widgets may not have any code so you want to ignore those while editing.
The Inspectors. Unlike the other three, the inspectors are not part of the project window; they are free-floating palettes. The three primary inspectors are Library, Attributes, and Frame.
The Library is where you obtain widgets to drag into your window in the Canvas (or into the Outline).
The Object inspector is divided into two “tabs”, only one of which is showing at any one time (click a button in the inspector’s “toolbar” to switch between them):
The Frame tab is where you can numerically alter the size, position, and resizing behavior of a selected widget.
The Attributes tab is where you can determine a selected widget’s desired properties, give it an AppleScript name, and so on.
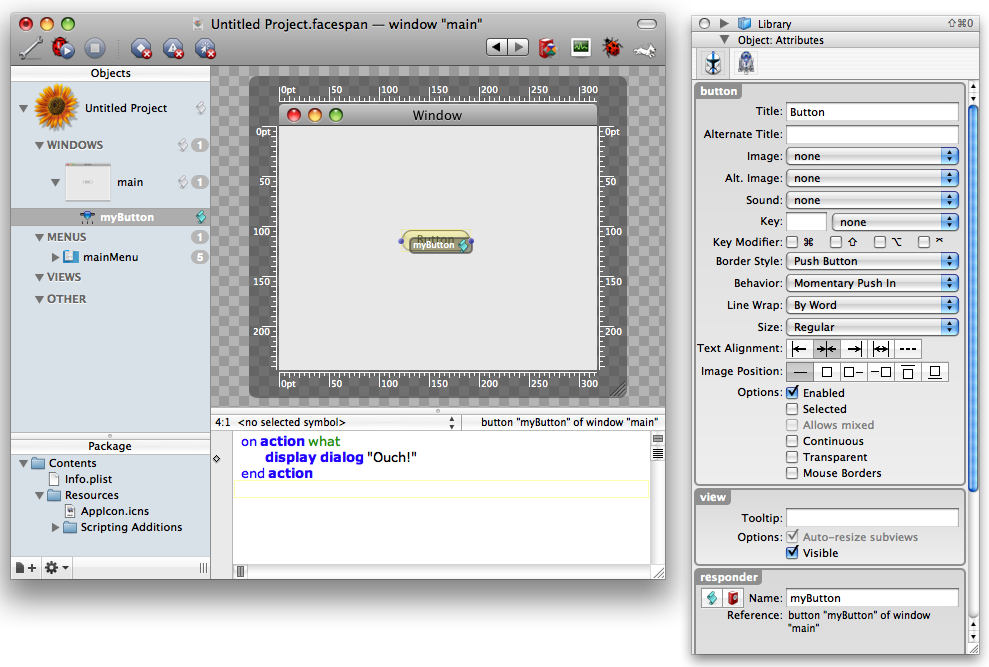
The FaceSpan 5 IDE, shown in its default layout. The Project Outline is at the left; then the Canvas on top with Code on the bottom. Then at the right are the inspectors. The button is selected, so its code is displayed in the Code area and its attributes are shown in the Attributes tab of the Object inspector.
The default arrangement is a three-panel project window plus the Inspectors. So, there is one window with the Project Outline at the left, the Canvas at the top right, the Code at the bottom right, and Inspectors floating elsewhere. However, you should be aware that the display is much more flexible than that. You can arrange the Canvas and Code to be side by side instead of one above the other. You can open multiple windows on a single project (they stay in sync with one another automatically). You can show code in its own window, you can make a project window show only the Canvas without the Code, and so on. So you can make alternate window arrangements that suit your tastes and monitors.
You’ll notice that the top-level application object in the Project Outline has four classifications of sub-items: besides Windows and Menus, there are also Views and Other. Other is for things like bags and other responders without interface. But what are Views? The application object has no visible avatar in the running application, so how can it have any Views of its own?
The idea is that you can drag into this category any container view objects (currently, that means box or background view) for storage, to be displayed during the course of the running application by moving or copying them into some visible location. You might do this by using the AppleScript move or duplicate command; also, alerts, the built-in file/folder dialogs, and menus can employ these views as accessory views.
See example: 03 PDF View. Illustrates use of a loose view as an accessory view in a File Open dialog.
See example: 04 Tab View. Tab views cannot yet be populated in the IDE, so the example illustrates how to do it in code by moving a loose view.
See example: 37 Split View. Split views cannot even be created in the IDE, so the example illustrates how to create one and then populate it by moving a loose view.
A significant non-obvious capability of FS5 is that you can drag or export things from a project to the Finder. A “thing” here could be a button (and its code), a window (and everything in it, including its code), and so forth. You can then drag or import the thing into another project, or share it with other users of FS5. If the thing finds its way into FS5’s Library folder, it shows up in the Library inspector. Thus, stuff that you create for a project is reusable.
Also, a project saved into FS5’s Examples folder appears in FS5’s New Project window for use as a template. This means the project is opened by copying it as a new project. This is another good way to reuse existing material.
The project file, as mentioned earlier, is actually a bundle (a folder disguised as a file); and so is the built application. Inside the project file, you can include application resources (such as image files, PDF files, movies, etc.), to be copied automatically into the built application.
You can inspect and manipulate your project bundle contents using the Package Resources pane (at the left of the project window, below Project Outline). The “tool” popup at the bottom of the pane lets you create a new folder, rename or delete an item, or delete an item. Click the “file” button at the bottom of the pane to add an item, or you can just drag from the Finder into the Package Resources pane.
Relevant widgets can automatically see such application resources. For example, the PDF View widget can load a PDF by name directly from within the bundle. In fact, the PDF View widget’s Attributes inspector in the IDE has a pop-up menu that lists all PDFs included in the bundle; with it, you can associate a particular PDF file with the widget, directly, in the IDE.
See example: 05 Image Button. The images are from resources inside the bundle, with no code required.
Furthermore, if a resource is a scripting addition (osax), and you place it inside a folder called Scripting Additions in the bundle’s Resources folder, the scripting addition will become part of your application and will be available to your AppleScript code. To develop your code using the scripting addition’s terminology, you also need it installed in your own Library’s ScriptingAdditions folder; but the project and built application will run without the scripting addition being installed in any Library, using the copy inside the bundle.
See example: 03 PDF View. Uses the LNS List and Record Tools osax.
It is also possible to access resources inside the bundle “manually”, in code. The application object has a resources folder property; take its POSIX path for a string that can be manipulated to access files inside it.
FS5 is lacking some widgets you may be familiar with from Cocoa; those will appear in a later release. However, even at this early stage, FS5 is remarkably rich in widgets and other objects, allowing you to accomplish a great deal very easily. Also, see on plug-ins, which will allow any Cocoa widget to be used in an FS5 application.
Here is a quick survey of the widgets that exist now. Further widgets will come online before the public release.
The following visible widgets can be created in the IDE or in code:
Although you can use the IDE to create a dynamic container view, such as a drawer or tab view or scrolling container view, you cannot populate it. Instead, populate a separate container view in the IDE and then, in code, move or copy that container view into the dynamic container view; see the 35 Toolbar example (the Smile button toggles the drawer) and the 04 Tab View example.
The following visible widgets can be created in code only:
See 37 Split View; split views are very easy to create and populate in code.
The following non-visible widgets (see Responders Without Interface) can be created in the IDE or in code:
You can also manipulate following in code:
request attention command)The following major widget functionalities are not yet working:
See also More About Widgets, below.
Note: Containers, such as the box and background view widgets, are working correctly, but at present are somewhat badly behaved in the IDE.
A user familiar with Cocoa/Objective-C can create additional FS5 widgets. Such a widget is called a Cocoa plug-in. In fact, some “native” FS5 widgets will be written as plug-ins.
Plug-ins can be used to make sophisticated widgets with complex functionality and interface, and to share them with other users. They can also simply make up for widgets that aren’t yet implemented in FS5. Thus, for example, even though there is no built-in full-fledged table view for this release, it is possible to create an Objective-C-based table view plug-in and use it from within FS5, and that is exactly what Simple Table is.
Details on how to write a Cocoa plug-in, along with the API that connects it to FS5’s code, will be made available eventually. However, plug-ins are working now. Using them is easy. Look in the Plug-ins section of the Library (in the Library inspector) for some fun example plug-ins you can play with. Their terminology appears as part of the FaceSpanKit dictionary (see next section for more about that).
Physically, a plug-in lives in a special place on disk, namely the Plug-ins folder, either in same folder as the FaceSpan 5 application or at Application Support/FaceSpan 5/Plug-ins. But apart from that, a plug-in might as well be a built-in widget:
To use a plug-in in the IDE, just drag it out of the Library inspector (from the Plug-ins section).
A plug-in used in the IDE has properties that can be inspected and adjusted in the Object inspector.
To learn how to talk to a plug-in in code, just look in the FaceSpanKit dictionary. The plug-in is represented by a class, and you can see its properties, events, FSNotification broadcasts, and so on.
Once you’ve drawn your interface and inserted some code, you then typically choose Project > Debug (Command-R). Your application builds and runs, and you can try it out. In this mode, you can pause and resume your application running in the debugger. You can step through your code, watching the values change. (You cannot, in this release, edit your code while it is paused.)
When your application is running in the debugger, Debug (Command-R) becomes Resume, which simply brings your application to the front, still running. To force your application to stop, rebuild, and start all over in the debugger, chose Project > Stop & Debug (Option-Command-R).
Debug mode inherits technologies from Script Debugger. You are expected to know about Script Debugger so you can appreciate these! There are four important windows, all accessible from Window > Tools:
The Event Log window (familiar from Script Debugger); logging is a useful debugging technique (and notice that in conjunction with the log command you may need to use the source for command to turn something into a string)
The Debugger window (familiar from Script Debugger script windows in debug mode); here you can set breakpoints and access the values of globals and declared locals
The Breakpoints window (so cool that Script Debugger has not even acquired it yet): lists and accesses breakpoints
The Mini Debugger (so cool that Script Debugger will never acquire it): puts up a small debugging interface in the same world as your running project
It is also very important to be aware of your three break options: Break on Breakpoints, Break on Exceptions, and Break on Events. If they aren’t set up the way you want them, you may not break as you expect. You can switch them while debugging. It’s a good idea to put their buttons into your toolbars.
Some features of Script Debugger have not yet been “switched on” in FaceSpan. You will notice, for example, that there are no separate viewer windows (explorers). You can explore directly in the variables pane (but you can’t explore the “parent” object in the variables pane).
The most important dictionary, at first, is FaceSpan’s own internal framework dictionary, because this tells you how the language works. This dictionary is called FaceSpanKit. It is much more heavily commented and hyperlinked than your average dictionary! In effect, it is a major part of the documentation. Again, you can (and probably should) add its button to your toolbars.
When you are all finished developing, choose Project > Build. This generates a stand-alone application that runs independent of FaceSpan.
There should not be a significant difference between the behavior of a project when you say Run (Command-R) to run in the debugger, and when you say Build and Run (Shift-Command-R) to build the real application and run it. If you notice such a difference, that is a bug and you should report it.
As already mentioned, FS5 enriches the AppleScript language to make it usable within an application framework. This section describes the AppleScript idiom you’ll use in your code, along with the concepts underlying FS5’s object and messaging model.
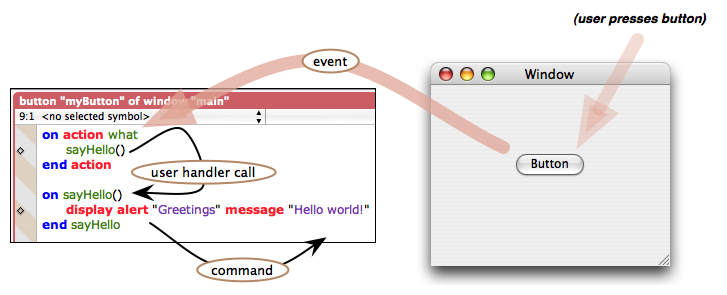
The fundamental thing you need to understand is the relationship between your application’s interface objects and your application’s code. For example, in the IDE, you can select a button in a window — let’s say it’s button “myButton” of window “myWindow” — and you can then enter code for button “myButton” of window “myWindow”. So what’s the relationship between this code and the button itself?
Your application’s interface is made up of widgets. Every widget has a script. Furthermore, the application itself has a script (the application object appears at the top of the hierarchy in the Outline). Furthermore, there are some kinds of object that can appear in the hierarchy in the Outline, that can have a script, but do not have any visible representation in the interface. (For example, bags and timers; these will be discussed later.) Such an object — a thing that can appear in the hierarchy in the Outline, and has a script — is called a responder.
The relationship between a responder and its script is linguistically very tight, almost as if they were the same thing. That is what makes FS5 programming object-based. You can draw a distinction between them if you have to (and this can be a useful thing to do), but in general you just treat them as a single thing. This point emerges particularly when you want to refer to a widget or to its script.
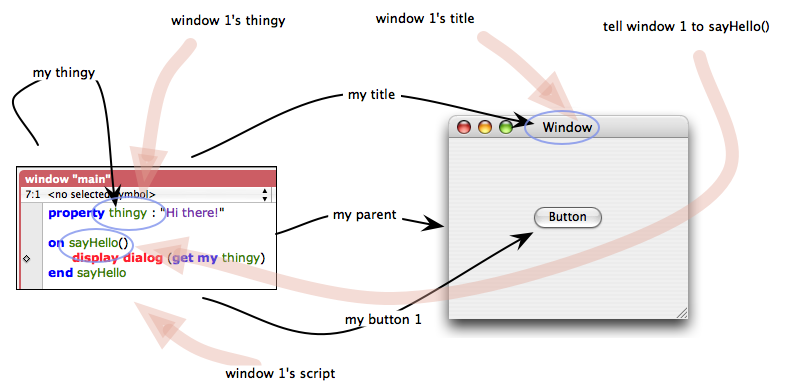
A responder (the window), its script, and some examples of how they relate to one another linguistically.
For example, when you send a message to a widget, you are really sending that message to its script (because that’s where the code is); but you don’t bother to say so. If you say tell window 1 to sayHello(), the sayHello() message is sent to the window’s script. This is great, because you feel like you are talking to your interface; your window itself seems to possess functionality, it “knows” how to sayHello(). Similarly, window 1's thingy means a global variable or property thingy of the window’s script (such a global variable or property must already exist in order to access it from outside the script like this).
In addition, a responder’s script needn’t do anything special to refer to the responder; linguistically, the script is the responder. In particular, attributes of the widget are treated as attributes of the script. For example, a window has a title, so a window’s script can speak of my title to refer to it. (Actually, the window’s script can speak of “title”, without “my”; but we strongly recommend that you use “my” in this situation, as a matter of style and clarity.) And you can access such attributes from a different script as well, e.g. window 1's title. This shows how thoroughly the object and the script are collapsed conceptually into one another; window 1's title means the title property of the window object, while (as mentioned in the preceding paragraph) window 1's thingy means the thingy global variable or property of the window object’s script (because a window object has no thingy).
(A script property or global whose name begins with an underscore character cannot be seen by another object’s code. This provides a degree of “privacy”.)
When referring to a script global or property from another script, you cannot currently mutate the value in place, even if its datatype is one that would normally be mutable in place (list, record, date, or script object). Instead, you must get the value (which fetches a copy), change it, and then set it back into the other script. Of course, a script can still mutate its own globals and properties in place in the usual AppleScript way.
Extra for Experts: The connection from a responder to its script is the responder’s “script” property. Your code can get and set this property dynamically; thus you can provide a responder with custom script functionality while your application is running. The connection from a script to its responder is provided through AppleScript script object inheritance and the “parent” property; thus, to a script,
my parentis the responder. (NB: To a script, the responder is notme; that, as you know, is the script itself.)See example: 06 Script And Responder.
See example: 07 Script Swapper.
As in most application programming frameworks, it is extremely important to know how to refer to objects. Once you have a reference to an object, you can send a message to it (e.g. a handler call) and you can access its attributes (and those of its script), as mentioned in the preceding section.
We may divide the business of getting a reference to an object into two parts, depending whether you are “approaching” the desired object upwards from below or downwards from above.
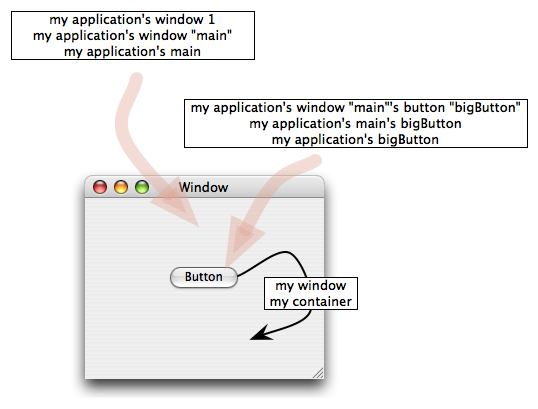
A widget’s container is what contains it in the interface, and in the hierarchy shown in the Outline. Thus, a button in a window has that window as its container, and so the button’s script can get that window’s title by speaking of my container's title, and so on.
Actually, in the specific case of a window, there is a way to shortcut the container hierarchy: any widget at any level of containment in a window can access that window using its own window property.
Similarly, any responder can shortcut the entire container hierarchy to reach the very top of the hierarchy, which is the application, using its own application property. (To make the shortcut even shorter, app is a synonym when typing. However, as a consequence of this, you cannot use app as a synonym when specifying another application, e.g. at the start of a tell block.)
Going the other way, you can navigate down the hierarchy by means of the elements of things. The element hierarchy is exactly the same as the container hierarchy I mentioned a moment ago, shown in the Outline, only in reverse; if A is B’s container, then B is an element of A. All windows are elements of the application object; all widgets at the top level of the window are elements of the window; and so forth.
For example, given a button in a window, the window is the button’s container, and the button is an element of the window. So the window’s script can refer to my button 1, or, using the button’s name, my button "bigButton" (or whatever its name is).
When referring to elements by number, the order of numeration is the order in which objects appear in the Outline. So, for example,
my app's window 1is not the frontmost window; it’s the window listed first among the application’s windows in the Outline.
However, that’s kind of wordy, so in FS5, the AppleScript language is magically enriched so that the name of an interface element of something is automatically a property of that thing. So, to repeat the previous example, the window doesn’t have to say my button "bigButton"; it can just say my bigButton.
Furthermore (and this is the Really Cool Part) this formulation jumps levels. Just as my application works from anywhere, and my window works from anywhere within the window at any depth, so my bigButton works in any container of the button, at any “height”. So, the application doesn’t have to say my window 1's bigButton; it can just say my bigButton.
Some real-life ways of referring to objects.
In real life, getting a reference will often be a combination of navigating upwards and downwards.
Example 1: Suppose you have a button and a text field in a window, and the text field is named “coolField”. Then the button can refer to the text field as my container's coolField or my window's coolField or my application's coolField.
Example 2: Suppose you have two windows, called “main” and “other”, each containing one button, called “mainButton” and “otherButton” respectively. Then the button “mainButton” can refer to the button “otherButton” as my application's other's button 1 or my application's other's otherButton or simply my application's otherButton.
Windows and other attributes of the top-level application object are not magically globally available (unlike in AppleScript Studio or REALbasic). But, as has just been shown, the application object is readily available from everywhere; so top-level application objects are easy to access nevertheless. So, you cannot globally say
window "main", but you can globally saymy application's window "main"or justmy application's main.See example: 08 Referring To Objects.
When communicating with other applications through a tell block, the system’s linguistic shortcuts for references break down. So, for example, you can’t say tell app "Finder" to get my enabled, because in “normal” AppleScript this means a script attribute enabled that doesn’t exist (see example, 09 No Mix and Match). The simplest solution is to keep such references out of a tell block. In general do not attempt to mix FaceSpan’s magical ways of forming references and sending messages with inter-application communication! When talking to another application, just talk normal AppleScript to it, and don’t try to refer to FaceSpan things beyond the current script.
To ensure that a reference is dereferenced and evaluated, you may have either to assign the reference to a variable or use get. You will probably end up using get rather more often than you are probably used to. Here’s an example. This won’t work:
on action what
    invoke operation what's op -- "op" is a property of "what"
end
This fails because in this context what's op is a treated as a reference, not a value. To force the value of op to be fetched and used, you could either assign to something beforehand:
    set s to what's op -- triggers implicit get
    invoke operation s
Or, if you don’t need to retain the value, you could use an explicit get:
invoke operation (get what's op)
Another example is item 2 of content frame. This won’t work, because we’re trying to combine the AppleScript notion of an item (of a list) and the FaceSpan notion of a view or window’s content frame; instead, say item 2 of (get content frame), where without the parentheses there’s a compile error and without the get there’s a runtime error. But no general rule is possible; the overuse of get is a peculiarity of Cocoa scripting, as you doubtless know from trying to script Cocoa applications, and some experimentation and discovery may be needed.
There is no identity operator. To test whether two references refer to the same object, test for equality of their ID properties. Every object has a unique ID (assigned dynamically as the object is instantiated at runtime, so don’t expect an object’s unique ID to be same across different runs of the application).
In an FS5 application, as in just about any application framework, none of your code runs until something makes it run. To be specific, your code must receive a message telling it to run. This message comes, ultimately, from stuff that happens in your application’s interface while it runs. Such a message is called an event, and each event is directed at some particular responder. As a programmer, your job is to know what events will be sent and what responder they will be sent to, so that if this is a message you want to react to, you can put your code in the right place. “Your code” will be an event handler for that event. (Like REALbasic or HyperCard, and unlike AppleScript Studio, you do not have to do anything special to arrange for an event to be sent to your code. Events are automatically sent to the appropriate object.)
To help you insert event handlers appropriate to an object, see Paste Event Handler in the Edit menu (and in a script’s contextual menu). This interface will eventually be improved further.
So, for example, if the user presses a button in your window, an event (called action) is sent, in the first instance, to the button’s script. If the user moves a window, an event (called window did move) is sent, in the first instance, to the window’s script. If the user hides your application, an event (called application did hide) is sent, in the first instance, to the application’s script. In each case, if you want to react to that event, you need an event handler. So, for instance, a handler with the opening line on action, in the right place, would be called when the button is pressed.
Some event messages (those containing the word “should”, such as “window should open”, “window should close”, etc.), if implemented, expect a boolean return value stating whether the proposed event is to be allowed to occur. It is recommended that in such a case you always provide an explicit return value, since AppleScript will otherwise provide an implicit return value and the outcome may be unexpected.
The three different types of message in a FaceSpan application.
Aside from built-in events, there are two other kinds of message flying around in an FS5 application. Built-in events are sent by FS5; the other two kinds of message come from your code. The three kinds of message are:
Events. Discussed above. Events originate with FS5 itself, and are the ultimate source of all activity in your code.
Commands. A command, such as open, is directed to a single object; it does not expect to find a handler responding to it, because the object already knows how to obey this command, and in fact if you create such a handler you can break the command, because you are interfering with the object’s ability to respond in its usual way. See Chapter 18 of ASTDG2. The FaceSpanKit dictionary distinguishes clearly between events and commands. The dictionary contains remarkably few commands (always a sign of a well-written object model).
User handler calls. A user handler is a handler whose name is up to you, the programmer. See Chapter 9 of ASTDG2 for the syntax of user handler definitions and calls. It is a runtime error in FS5, as it is in AppleScript generally, to call a user handler for which no definition can be found.
The syntax for directing a user handler call to a specific responder is a tell. So, if foobar() is a user handler in a responder, and what is a reference to that responder, you cannot say what's foobar(); you must say tell what to foobar() (or else, call foobar() in a larger tell block directed at what). We’re sorry about this, but it’s just the way it is.
In FS5, a user handler can call an event handler in the same script.
It may perhaps be worth reiterating that the FaceSpan programming model is event-driven. You should never, ever, be looping waiting for something to happen or checking and rechecking the state of something. You should never use an idle handler. FaceSpan does not “block”, watching for things to happen. It receives and emits events only when things actually do happen. Thus there is a long list of event handlers and FSNotifications (discussed later) that you can use to be informed when the state of something changes. If you find that there is not an event for some functionality you need, let us know so that we can build it in.
One more word about event handlers. In AppleScript, the name of an event handler is the name of the verb; the parameters are just parameters. Thus, in defining an event handler, you do not need to include parameters that you don’t need; it’s still the same event handler and will still be called without error. So, for example, the canonical form of the alert did end event as shown in the dictionary is:
on alert did end theObject reply replyParam accessory view accessoryViewParam
But aside from changing the parameter names, you can also omit any or all of the parameters, and (except for the first parameter) they can be specified in any order. So, any of these formulations is legal:
on alert did end what reply r accessory view av
on alert did end reply r
on alert did end accessory view av
on alert did end accessory view av reply r
on alert did end what
on alert did end
In my own coding, I take advantage of this freedom, as a way of clarifying my code.
Note: The
callcommand lets you translate a string into a user handler call. This is useful if the user handler name isn’t known until runtime; also, it lets you insert a delay before the call is performed, which can be useful for extricating yourself from certain tricky Cocoa timing issues.
Okay, now comes the Really Interesting Part. Take a deep breath. In the preceding paragraphs, I used the phrase “in the first instance,” because an event or user handler call that isn’t handled in the script to which it is sent initially is passed up the delegation chain to another script.
You’ll notice that I didn’t say “command”. There is no delegation chain with respect to a command, and it is a runtime error (as well you know) to send a command to an object that doesn’t know how to obey it.
By default, the delegation chain is effectively the same as the container hierarchy. So, if the user presses a button in your window, the action event message is sent, in the first instance, to the button’s script. If that button script contains a handler for the action event, the handler runs. But if that button script does not contain a handler for the action event, the event is passed up the delegation chain, which by default is the same as the container hierarchy — which means that it now arrives at the window’s script. Again, if the window’s script has a handler for the action event, the handler is called; if not, the event is passed up the delegation chain again, to the application’s script. If the application’s script has no handler for the action event, nothing bad happens; the event is simply ignored. (If you’ve done any programming with HyperCard, REALbasic, or Cocoa/Objective-C, all of that should be fairly intuitive and familiar.)
Thanks to the delegation chain, the responder that handles an event need not be the responder to which the event was originally directed. However, every event sent by the FS5 application framework includes, as its first parameter (which I like to call
what), a reference to the responder to which it was initially sent; this can be useful in your code to find out who the original recipient of the event was. I also like to call this original recipient the OTO (“Originally Targeted Object”). So, the first parameter of any event handler is the OTO.
The delegation chain applies also, as I mentioned before, to user handler calls that appear in your script. Suppose you tell a certain object to doYourThing(). If there is no doYourThing() handler defined in the script to which the call is directed, the handler call is passed up the delegation chain to the next script. In this case, however, if the message reaches the application script and there’s still no handler for it, a runtime error is generated.
See example: 10 HelloWorld With Delegation
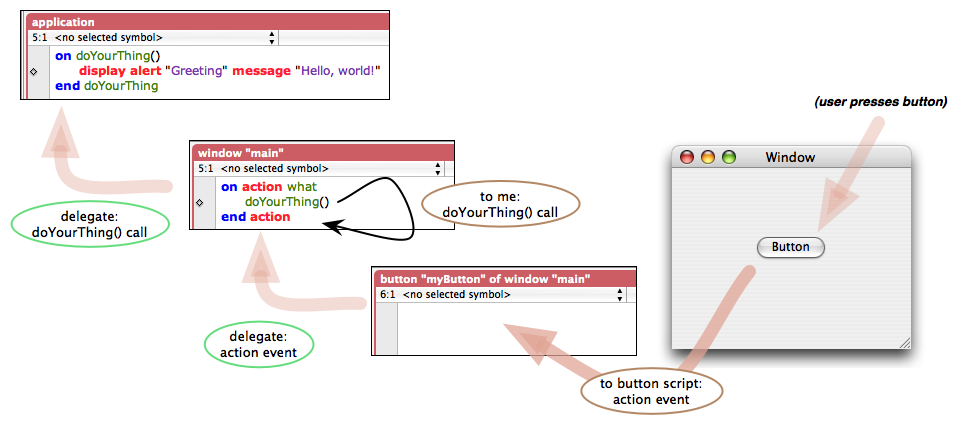
Examples of delegation in FaceSpan’s messaging architecture.
To send a message from an object to its delegate, use the continue command. (For technical reasons, this is preferable to, and better behaved than, trying to “tell my delegate” something.) Recall from your knowledge of AppleScript that this command takes as its parameter a handler call. This handler call can be the very same handler call that your script just received. In other words, if a message arrives at a script and the script contains a handler for it, the script can still pass the message on up the delegation chain, using continue. However, you can use continue to send any message. It doesn’t have to be the same message you just received, or it can be the same message with a different parameter, or whatever.
Earlier, I said that an object’s delegate is its container, by default. You are free to change this, either in the IDE or in code. Here’s what you need to know:
Delegation is determined either by rule or by specific object. For example, the notion that an object’s delegate should be its container is a rule; the object’s delegate is not some specific object, but whatever object happens to be its container at any moment. These rules are encapsulated in an enumeration whose enumerators are: application responder, container responder, key view responder, key window responder, and main window responder. Thus if you want an object’s delegate to be whatever window is main at any given moment, set its delegate property to main window responder.
On the other hand, you can also just set an object’s delegate to some specific responder, e.g. set my responder to my app's window 1.
You can also do both of those things with a pop-up menu in the IDE. You can set an object’s delegate by rule or to a specific responder.
To inquire in code what an object’s delegate is, you use one of three techniques:
Ask for its delegate. The result is an enumerator telling you the rule by which that object’s delegate is determined, and in order to make use of this information you will have to compare the result directly against particular enumerators you’re interested in. If the object’s delegate has been set to a specific object, not a rule, the result is missing value.
Ask for its next responder. The result is a reference to the next object up the delegation chain. If the object is at the top of the delegation chain (e.g. because it is the application), the result is missing value.
Ask for its next responder with script. The result is a reference to the next object up the delegation chain that actually has a script with some code in it. Clearly an object without a script that has code cannot respond to an event, so this property lets you bypass the useless part of the chain. If no object further up the delegation chain has a script, the result is missing value.
See example: 11 DelegationTest.
Every responder receives an event when it is created, and another when it is destroyed. Responder creation takes place when your application starts up, as the interface that you designed in the IDE is instantiated. Destruction takes place when your application quits in good order. In addition, all responder types can be dynamically created and destroyed during the course of your running application (for example, you can make a new window and put a button in it, completely in code, as shown in the 02 HelloTotallyDynamic example); this is done with the AppleScript make, duplicate, and delete commands (and certain widgets have the ability to delete themselves when their one-shot functionality is completed). Your responder gets an event as it is created or destroyed in this way as well.
The creation event is called initialize.
The destruction event is called destroy.
The delegation chain applies to these events as to any other. This means that if an object high up the responder chain handles one of these events, and no object lower down handles them, the object high up the responder chain will receive these events many times, as the objects lower down are created and destroyed. To avoid mistakes in your code, you will probably want to check whether the event this object is receiving is the event specifically directed at this object. As mentioned earlier, the identity test for objects is the equality test for their IDs, so the way to do this is to compare the ID of the originally targeted object with this object’s own ID.
See example: 12 Dynamic Buttons and Bag. There are some things in this example that are not discussed until later on this page (such as bags), but the example is simple enough. Buttons are created dynamically based on the contents of the Resources folder; notice the use of the
initializehandler to set everything up.
The broadcast architecture is a messaging architecture. A broadcast message has a sender, called the broadcaster, and one or more recipients, called the listeners. A listener becomes a listener by registering (in code) for a broadcast.
With built-in events, the FS5 application framework directs each event to one particular object; FS5 has already decided in advance who this one particular object will be. With a handler call, too, you send the handler call, explicitly or implicitly, to one particular object of your own choosing. But a broadcaster doesn’t send a broadcast message to any particular object; the broadcaster sends the message into the air, as it were, and any listeners who have registered for it, receive it. FS5 itself acts as the broker for registration and the medium for transmission of broadcast messages.
So, the major differences between the broadcast architecture and the messaging architecture previously discussed are that (1) a single broadcast message can be received by multiple listeners, and (2) with the broadcast architecture, the initiative as to where the message goes lies with the recipient, not the sender. Users of Cocoa / Objective-C will recognize that the broadcast mechanism is similar to the Cocoa notification mechanism.
The sender of a broadcast message typically doesn’t know or care who the listeners are, and the broadcast architecture exists precisely for those situations where this is the appropriate / convenient way to program. I like to say that the broadcaster’s attitude, as he fires a broadcast into the air, is: “He who has ears to hear, let him hear.”
A broadcast message has a name. It also has a broadcaster, who explicitly sends the message. When a listener registers, it can specify the message name it’s interested in, the broadcaster it’s interested in, or both, or neither:
If a listener registers specifying both a message name and a specific broadcaster, then that listener will get an event when that broadcaster broadcasts that message.
If a listener registers specifying a message name only, then that listener will get an event when any broadcaster broadcasts that message.
If a listener registers specifying a broadcaster only, then that listener will get an event when that broadcaster broadcasts any message.
If a listener registers specifying neither a message name nor a specific broadcaster, then that listener will get an event when any broadcaster broadcasts any message.
The full broadcast architecture is a two-step process; first, an object must register to become a listener; then at some later time, that listener can receive a broadcast.
To register as a listener, an object is sent (or sends itself) the listen command.
It is quite common for an object to register itself as a listener in its own initialize event handler, because that’s as early as you can get. But there is no law requiring this approach.
To broadcast a message, an object is sent (or sends itself) the broadcast command; this causes FS5 to send, immediately, a did broadcast event to every appropriately registered listener. The did broadcast event is an ordinary event, so either the listener or some object up the delegation chain should implement a did broadcast event handler in order to react to the broadcast (but, as with any event message, there is no penalty if there is no did broadcast handler). The did broadcast event is accompanied by parameters specifying the broadcaster and the message name, so the listener can distinguish what broadcast is arriving; it is also accompanied by any arbitrary data the broadcaster has included with the message.
The canonical did broadcast event handler looks like this:
on did broadcast theListener message m user data d broadcaster b
    -- react to receiving broadcast here
end did broadcast
The first parameter is, as usual, the OTO, the registered listener to whom this event was originally sent.
See example: 13 HelloBroadcast.
A listener can unregister (through the cancel listen command). It is also possible to obtain a list of listeners registered for a particular broadcast.
There are several unpleasant things about the canonical did broadcast event handler (shown above):
If this script can expect to receive more than one broadcast, it must test for different broadcasts within this same handler. We thus end up with an unpleasant if...else if...else structure within the did broadcast handler. If you’re an AppleScript Studio refugee, this is just the sort of unpleasantness you’ve come to FS5 to get away from.
Nothing about the did broadcast event handler tells you, the programmer, what broadcast(s) the code expects to receive. This makes the code hard to read and maintain.
If the did broadcast event handler receives an unexpected broadcast and fails to continue did broadcast, it has effectively “eaten” the broadcast message and prevents any scripts further up the delegation chain from receiving it. That’s fragile: it’s a mistake waiting to happen.
It would be much better, therefore, if you could implement just one event handler for each particular broadcast you expect to receive. Well, you can! To do so, take advantage of broadcast name munging: for each broadcast you expect to receive, implement a user handler whose name is “didBroadcast” along with the desired broadcast message, like this:
on didBroadcastUserPressedMe()
    -- react to receiving broadcast here
end didBroadcastUserPressedMe
That is a name-munged user handler. FS5 will notice its presence and will route appropriate broadcast messages to it, in preference to a full-fledged did broadcast event handler if there is one. Of course, if there is no name-munged user handler for a given broadcast message, and there is a did broadcast event handler, the latter will be used.
In the above example, the user handler took no parameters; but it can alternatively take one parameter, or two, or three.
If it takes one parameter, that will be the OTO, the listener to whom the event was initially sent.
If it takes two parameters, the second parameter will be the user data included with the original broadcast (or missing value if there is no user data).
If it takes three parameters, the third parameter will be the source or broadcaster, the object emitting the original broadcast.
If you want to use continue to pass along a broadcast message from a name-munged user handler of this kind, you must use a command of the full form continue did broadcast theListener message m user data d broadcaster b, so you must give your user handler all three parameters in order to capture that information.
See example: 14 HelloBroadcast With Name Munging.
Note: If a broadcast message name contains spaces or other unusual characters, you won’t be able to use a name-munged user handler, because you won’t be able to form a legal user handler name. So don’t do that.
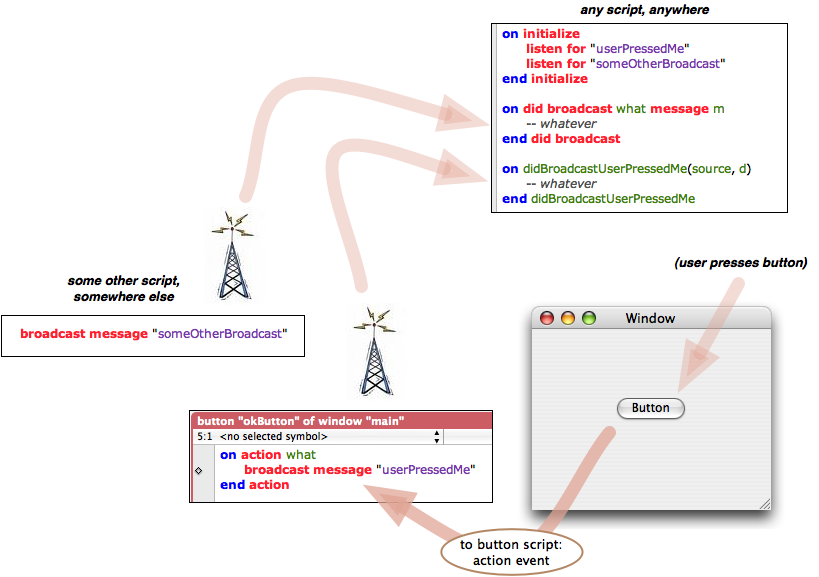
The broadcast architecture in FaceSpan, including name munging. At broadcast time, the message “userPressedMe” finds a didBroadcastUserPressMe() user handler in a registered listener and calls it. But the message “someOtherBroadcast” does not find a didBroadcastSomeOtherBroadcast() user handler, so it calls the did broadcast event handler instead.
FSNotifications are a secondary set of events sent by FS5, built on the back of the broadcast architecture. Here, FS5 itself is the broadcaster, and an object interested receiving an event must register as a listener (and will then receive did broadcast events as appropriate).
The idea here is that, unlike FaceSpan’s set of normal events, these are events where (1) it is unclear to who to send them to initially, and (2) they are in some way “optional” so it is unclear whether you even want to receive them. The broadcast architecture is therefore exactly appropriate; an object that wants to receive one of these events can just register for it, and problem solved.
To register an object for an FSNotification, use the listen command, just as for a normal broadcast, specifying the name of a built-in FSNotification, such as “FSWillLaunchApplication”. The built-in FSNotifications are listed under the “Notifications” category in the FaceSpanKit dictionary. Parameters for a did broadcast event are just the same with an FSNotification as for any other kind of broadcast, and you can use a name-munged did broadcast user handler or not, as you please, just as with any other kind of broadcast.
There are two main kinds of FSNotification:
Some FSNotifications are broadcast by specific widgets. The broadcaster is the widget. For example, the HTML View widget provides three FSNotifications, so your code can respond to things such as when the view has finished loading and rendering some HTML. In case like this, there may also be a built-in event that can tell your code the very same thing. So, the HTML View widget has both an html view did finish loading event, which you can handle through an event handler, and an FSHTMLViewDidFinishLoading broadcast; and several widgets with action events also provide an FSControlValueDidChange broadcast. This duplication is simply to provide you with maximum flexibility.
See example: 15 HelloBroadcast Using FSNotification.
See example: 16 Slider Percentage. This example truly illustrates why this kind of FSNotification is useful.
Other FSNotifications are broadcast in response to an external system-level occurrence, such as an application being launched or quit, or a volume being mounted. The broadcaster is the application object (current application).
See example: 17 Current Application. Tiny app that constantly displays the name of whatever application is frontmost.
See example: 18 Float Over Finder. Practical application of the foregoing: a window that appears floating over the Finder, and disappears when the Finder is not frontmost.
An operation is something that a widget knows how to do. For example, a text field knows how to cut, copy, paste, and select all. If everything that every widget knows how to do were represented by a separate command, there would be a zillion commands, and the dictionary would swell horribly. Therefore, to get a widget to perform an operation, you use just a single command: the invoke command. It takes an operation parameter specifying the operation you want performed, as a string.
Operations that a built-in responder knows how to perform are listed in the dictionary under the class’s Operations subheading. All operations are listed in the dictionary under the Operations category, at the top level of the browser and by suite.
So, for example, to tell a text field, in code, to cut, you might say:
tell my myTextField to invoke operation "FSCut"
An invoke command sent to any responder causes that responder to receive a did invoke event. If the responder is a widget that knows inherently how to perform this operation, it performs it, and that’s the end of the matter. But otherwise, the did invoke event is passed to the responder’s script, and so up the responder chain.
This means that your own code can share in the power, simply by implementing a did invoke event handler. As with did broadcast, you can do this in two ways. You can implement a straightforward did invoke event handler, whose canonical form looks like this:
on did invoke what operation op
    -- whatever
end did invoke
This formulation, however, is subject to objections similar to those we talked about for the did broadcast event handler, above. Your handler receives every operation message that comes up the delegation chain, and you have to test to see whether this is an operation you are prepared to obey; and you must remember to continue the did invoke event otherwise (since if you fail to do so, you may cripple your application by blocking operation messages that can be obeyed by responders higher up the delegation chain). To avoid the fragility and inconvenience of this situation, you can take advantage of operation name munging, which is just like broadcast name munging:
on didInvokeMyCoolOperation()
    -- whatever
end didInvokeMyCoolOperation
That user handler will receive only “myCoolOperation” did invoke events. If you give the user handler a single parameter, it will be the OTO (the responder to which the did invoke event was originally sent). If you want to continue out of that user handler, you must use the full format, continue did invoke what operation op (with appropriate values for what and op).
See example: 19 Invoke.
This section describes the FS5 menu system, which is made up of two classes: menu and menu item. The discussion of menus follows perfectly on the discussion of operations, because menu items use operations to trigger actions when chosen.
A menu item can only be contained by (an element of) a menu item or a menu. So, there’s a menu, and it has menu items, and those can have menu items, and so on.
For example, the main menu is a menu; everything within it, at any depth, is a menu item. The menu items that it contains at top level are the menu titles that appear in the running application’s menu bar. Any menu items at a deeper level that contain menu items are hierarchical (submenus). The order in which menu items are arranged as elements of their container is the order in which they will appear in the physical menu in your running application.
So, for example, let’s consider the standard main menu of an application:
The main menu is a menu, and has a menu item “editMenu” whose title is “Edit”; that is why the word “Edit” appears in the menu bar.
The “editMenu” menu item itself has many menu items, with titles “Undo”, “Redo”, [a separator], “Cut”, “Copy”, and so on, through “Speech”; and that is the order in which those menu items appear in your application’s Edit menu.
The “Speech” menu item itself has two menu items, with titles “Start Speaking” and “Stop Speaking”; therefore, in your application, “Speech” is a submenu with two hierarchical menu items, “Start Speaking” and “Stop Speaking”.
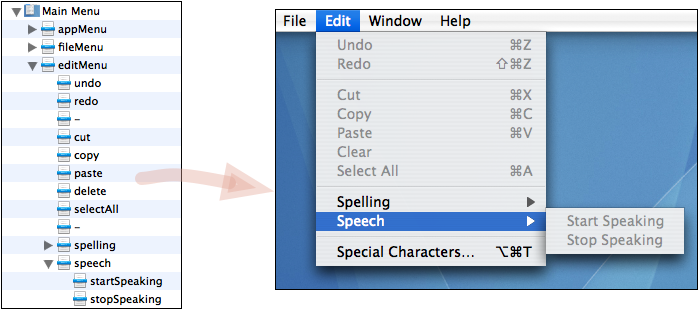
How menu item containment maps to the physical appearance of menu items.
As a convenience, a menu can be contained by (an element of) a menu item; thus you could take an entire menu and easily turn its items into hierarchical menu items of a submenu without having to copy those items one by one. In such an arrangement, the menu itself has no physical representation in the interface.
A menu can be contained by any responder, and this has no visual meaning at all. You can use the menu object’s position in your project’s container hierarchy to refer to the menu in code, but mere containment doesn’t cause a menu to appear in the GUI.
What does cause a menu to appear in the GUI is ownership. Every responder that can display a visible menu in the GUI has a corresponding property that determines what menu this should be. A menu that functions as the value of such a property is said to be “owned”, and its owner property is set accordingly, automatically. A menu with no owner doesn’t appear in the GUI. A menu can have at most one owner. An owned menu can live anywhere; a menu does not have to be contained by a responder to be owned by that responder.
So, for example:
The application object has a dock menu property. Set it to any menu (no matter who contains that menu), and that menu’s owner becomes the application object. (You can do this in the IDE or in code.) That menu then appears in the Dock menu.
A popup button has a popup menu property. Set it to any menu (no matter who contains that menu), and that menu’s owner becomes the popup button. (You can do this in the IDE or in code.) That menu then appears in the popup button.
The fact that a menu can have only one owner means that the very same menu thus cannot appear in two different places in the GUI at the same time. But menus can be duplicated, so that is not much of a restriction.
The application’s main menu is sort of a special case. The application object always has the project’s main menu as its main menu property. The main menu’s owner is the application. This is the only menu whose ownership cannot be changed. You cannot delete the project’s main menu, nor can you create a new menu and make it the main menu; the relationship between the application object and the main menu is fixed and immutable.
Menus and menu items can be created and destroyed on the fly (i.e. in code), and a menu can be assigned ownership on the fly (in code). Thus, menus are highly dynamic.
See example: 20 Dynamic Menu Population. Three menus are given menu items in real time, as the application starts up.
See example: 21 Dynamic Menu Ownership. A segmented control lets the user switch between which of the two menus is shown a popup button’s menu.
When the user chooses a menu item, how does the application know what do in response? The answer involves the operation architecture. A menu item has an operation property (a string), which can be set in the IDE or in code. Then, when the menu item is chosen, it is sent a did invoke event which rises up the delegation chain.
To ensure that a menu item in the menu bar has the proper responders in its delegation chain, the main menu’s delegate is set to key view. Knowing this, we can understand how the main menu’s items actually work.
For example, let’s talk about how the Edit > Cut menu item works when a text field has focus. The Edit > Cut menu item’s operation property is "FSCut". So when the user chooses Edit > Cut, the menu item receives a did invoke event with an "FSCut" operation. The text field that has focus is the key view, and so it is the delegate of the main menu. So the did invoke event rises up the delegation chain and reaches the text field, which responds by performing the "FSCut" operation.
It should now also be clear how you could have your own custom menu item with its own custom operation, and how your code could respond to the user choosing this menu item. Suppose your menu item’s operation is "myCoolOperation". Then when the user chooses that menu item, a did invoke event rises up the delegation chain from the menu item, and your code can receive this with a did invoke event handler or a didInvokeMyCoolOperation() user handler, and can react accordingly.
If, on the other hand, you are lazy and you don’t bother to give a menu item any operation, then when the user chooses that menu item, FaceSpan sends a did invoke event anyway, supplying "FSGenericOperation" as the operation’s name. Again, your code can receive this with a did invoke event handler or a didInvokeFSGenericOperation() user handler.
See example: 19 Invoke. I know, you already looked at it. Well, look at it again! Notice how each time you choose a menu item while the text field has focus, an operation invocation is sent to the text field (the example reports the details to you in a dialog).
If a menu item is disabled, it cannot be chosen by the user. There are two different paradigms for enablement of menu items, which we can call “static” and “dynamic”. Which paradigm is used depends upon whether or not the menu item has an operation.
If a menu item has no operation, then static menu item enablement is used.
Each menu item has an enabled property. If the enabled property is true, the menu item is enabled; if false, the menu item is disabled.
This sort of static menu item enablement is appropriate, for example, in the case of a popup menu. But you are free to use it with menu items that you insert into the main menu as well.
See example: 22 Static Menu Enablement. (See also 22a Menu Item Hiding, which shows that in some cases you might use menu hiding instead of bothering with enablement at all.)
If a menu item has an operation, then dynamic menu item enablement is used.
The menu item’s enabled property is ignored. Instead, when the question of menu item enablement arises (because, for example, the user proposes to display the menu item or chooses its keyboard shortcut), we search up the delegation chain for a responder or script which can handle either a should enable event or a did invoke event, for this menu item’s operation. If we find the should enable handler first, the menu is enabled or disabled, according as that handler returns true or false. If we find the did invoke handler first, the menu is enabled. If we reach the end of the delegation chain without finding either, the menu item is disabled.
The syntax of the should enable event is just like that of did invoke — it includes as parameters the originating responder and the operation. And, just as with did invoke, you can either implement should enable in its full form or you can implement a name-munged user handler, such as shouldEnableMyCoolOperation(). If your name-munged user handler has a single parameter, it will be the originating responder.
The thing to remember when handling a should enable event is that you must return true or false! When a menu item is the source of the original should enable event, this will result in the menu item being enabled or disabled, respectively. You must also remember to continue the should enable event if necessary, lest you interfere accidentally with enablement that is not in your charge. To continue out of a name-munged user handler, you must use the full canonical continue should enable what operation op format.
So, you can think of dynamic menu item enablement as coming in two flavors, a more complex and a simpler flavor.
With the simpler flavor, there is no should enable hander, but there is a did invoke handler, and so the menu item is enabled. This is nice because it gives you a way to let a menu item have an operation and just enable it without doing anything special.
With the more complex flavor, there is a should enable handler, and enablement depends upon what it returns. This is nice because it allows you to make the menu item’s enablement truly dynamic; the should enable handler will be called many times during the course of the application’s lifetime, and each time, it can make a new decision about whether or not to enable the menu item.
Dynamic menu item enablement explains how the main menu is able work in cooperation with standard widgets. For example, if a text field has focus, and if there is a selection, Edit > Cut should be enabled; otherwise, it should be disabled. And that is just what does happen. If a text field has focus, it is in the menu’s delegation chain (because the main menu’s delegate is key view), so it receives the enablement request for "FSCut" and returns true if there is a selection and false if there is an insertion point, and the Edit > Cut menu item is enabled or disabled accordingly. If a text field does not have focus, the enablement request for "FSCut" percolates all the way up the delegation chain without being handled, and the Edit > Cut menu item is disabled.
See example: 23 Dynamic Menu Enablement. Exactly the same as 22 Static Menu Enablement except that the menus are enabled dynamically. Interestingly, the dynamic version ends up being a lot simpler, because the operations allow the menus to be enabled and responded to in a compartmentalized way.
A few responder types have no interface. These objects have a place in the object hierarchy in the Outline; they are part of your application’s container/element hierarchy. But they have no visible avatar in the Canvas or in your running application. Such responders are of two types: bags, and all the others.
A bag is a blank responder with no representation in the interface and no built-in functionality. In essence, it’s just a script, wrapped up in a responder object so that it can be used in your project’s object-based architecture. So, it has a container, and it is part of a delegation chain, and it receives initialize and destroy messages, but that’s all it inherently does.
So what can you do with a bag? Anything you like! A bag is a very powerful, flexible device for packaging code that doesn’t deserve to be part of any one interface object’s script. I’ll give just one example of a way to use bags that comes immediately to mind: as a way of overcoming the fact that FS5 is object-based but not object-oriented. When multiple objects are of the same “type” and have the same functionality (what in object-oriented programming would be multiple instances of a single class), clearly you don’t want to duplicate that functionality inside each and every one of the objects: instead, that functionality can be packaged up in a single bag which is the delegate of those objects.
See example: 12 Dynamic Buttons and Bag. The buttons all do exactly the same thing, expressed in a bag which is their delegate.
See example: 16 Slider Percentage. There are three “compound widgets” (each is a slider paired with a text field). They all have the same functionality so that functionality goes into a bag.
In both the above examples, default delegation alone could have solved the problem — the widgets are all in a window, so why not just put their functionality into the window script and let container delegation take care of it? That works, but it’s inelegant and fragile. What if we have three buttons of type A and three buttons of type B? We don’t want the window’s script to have an action handler that chooses between the two types. Besides, the point of object programming is that an object should know and do the things that are appropriate to it; it seems wrong for the window to contain the code that properly belongs to the buttons. A bag solves all of this very neatly.
The placement of a bag within the containment hierarchy is (or can be) significant. In 12 Dynamic Buttons and Bag, for example, the bag is contained by the window; it has container delegation, so the window is its delegate. The bag, in turn, is the buttons’ delegate. So when a button calls play(), that percolates up to the window, which is the appropriate entity for this task. Plus, the location of the bag helps to remind you of its purpose: in 16 Slider Percentage, the bag lives in the window along with the compound widgets whose functionality it contains. Also, a bag can’t contain visible widgets, but it can contain responders without interface, including other bags, so it can be a powerful way of organizing parts of your project’s functionality structure.
These responder types without interface have built-in functionality. This means you have a choice: you can create such a responder in the IDE, or you can create it entirely dynamically, in code, as the application runs.
If you create them entirely in code, they have no editable script, but they don’t necessarily need one because their built-in functionality is sufficient. This approach may be considered “lightweight”. To make it even more so, such responders often have an auto delete property; if set to true, then when the responder has done its work it destroys itself, saving you the bother.
On the other hand, if you create them in the IDE, now you have a script to edit, and you might use this to make the object-based architecture more self-contained. It’s up to you.
I’ll just give examples for a couple of these responder types, simply because it might not be obvious how to use them otherwise. That should be enough for you to get the hang of it, so there’s no need here for fuller discussion of all the types; see the FaceSpanKit dictionary for more. So, I’ll sketch the use of timers and tasks. The other responders in this category are bonjour domain browser, bonjour service browser, speech synthesizer, and (eventually) speech recognizer; plus there are quite a few plug-ins that work this way as well.
A timer is a responder that “fires” (receiving a timer fired event), once or repeatedly, after a specified interval of time has elapsed. This can be used as the equivalent of an “idle handler” or in any other useful way.
In FS5, never use an “idle handler” or loop-and-poll (with or without delay) waiting for something to happen. Look to see if the thing you are waiting for can send you an event; if it can’t, so that waiting is truly necessary, use a timer. See also on forking.
See example: 24 Timer. The timer is instantiated in the IDE.
See example: 25 Timer Dynamic. Exactly the same as the previous example, except that timer is created dynamically, in code. The timer comes into existence with no code of its own, so we catch its events through delegation (alternatively we could assign it a script in code).
A task is a responder that talks to the shell. This is often better than do shell script because the task runs in a separate thread. A task ended event is sent to the task when the shell command finishes executing.
See example: 26 Calendar Task.
Forking is FaceSpan’s version of threading. It is intended for situations where you want to perform a time-consuming inter-application communication task (i.e. telling another application to do something that takes a long time) while letting the user continue to work with the interface.
In a responder’s script, start with an AppleScript script object. (You can obtain this script object in any of the usual ways: it can be a script object in this script or in some other script, it can loaded with load script, etc.) Now you can launch that script object as a separate process, with the fork command. That’s all there is to it. And the wonderful thing is that communication from the forked script object to the rest of your code is very easy. (Such communication is called a callback.) The parent of the script object is the responder to whom the fork command was originally sent. So, my ends up meaning exactly the same thing it does in the responder script. If you say my title in the forked script, and the forked script object has no title property, the title property will be sought, in the usual way, in the responder script and its widget. By the same token, my window, my container, and my application work in the normal way (as described above). Similarly, if you execute a user handler call in the forked script object, the handler will be sought first in the script object, then in the responder script, and then up the delegation chain in the usual way.
The fork command returns a reference to the forked process, which is a task object. If you like, you can capture this reference. You could use this to kill the forked process in midstream (by telling it to stop). Note, however, that killing a fork does not kill a process in another application initiated by the fork.
Since the fork is a task, the parent (the responder who initiated the fork) gets a task did end event. (You might be able to get the task’s source at this point; I’m rather confused about this, though.)
See example: 27 Fork.
Here are a couple of things to watch out for:
The forked script object is operating in its own process and does not block. But whenever you call back from the forked script object into the responder’s script, the fork is blocked until the responder can handle the callback. In general, there will be no perceptible delay; even if the main part of your application is in the middle of some lengthy process, the forked script object will be able to call back into the responder’s script, and the main lengthy process will then continue on. (You can see from this why things might get tricky with forks.) Still, if the interface itself is blocking (which can happen if the user is exposing a menu or is in the middle of live-resizing a window), the callback cannot occur. There are some even trickier cases: for example, if the forked script tries to call back while the main part of your application is putting up a display dialog, the fork will just die.
Scripting additions, by default, are called through the responder; they count as callbacks. However, there is a workaround; use tell current application. In the forked script object, current application means the forked script object’s own process.
You cannot yet customize an application’s dictionary. However, your application automatically acquires the FaceSpanKit dictionary. This means that, as with AppleScript Studio, you can point your copy of Script Debugger at a FS5 app (running in FaceSpan, or built and running independently), and use the Explorer to study its interface elements. This can be useful for debugging (especially since you can’t yet perform this kind of exploration within FaceSpan’s own debugger). You can also do a lot of other cool things such as see and modify a widget’s script, modify the interface, and so on, by talking to your running application with AppleScript. Also, you can call handlers in your application’s code! The delegate chain works normally, so if you tell a button to doSomething() and its delegate is where doSomething() is implemented, doSomething() will run.
Besides the standard project template (currently called “FaceSpan 5 Seed”), two additional project templates are included called “Applet” and “Droplet”. These do not represent the traditional AppleScript applet and droplet; they are perfectly ordinary FaceSpan projects which make perfectly ordinary FaceSpan / Cocoa applications. But they are supplied with code and icons such that they look and behave quite like a traditional AppleScript applet or droplet.
The applet or droplet is an application with minimal menus, no windows, and an application icon that looks like an AppleScript applet or droplet. The application object’s delegate is the appletSupport bag. The order of events at startup is:
The application object’s run handler (top-level code) is called, unless this is a droplet and was started up by the user dropping Finder items onto its icon, in which case the application object’s open handler is called. You can define both, and the appropriate one will be called, depending how the user started up the app.
The application object’s application launched handler is called, and this call propagates by delegation to the appletSupport bag. As you can see from the code there, the decision is now made whether to quit: by default, yes, but if you have set the application object’s FSStayOpen script property to true, then no.
If we have not quit, the application object’s idle handler is called. This is purely for compatibility with traditional AppleScript applets and droplets, and works similarly, but use of this feature is not recommended! If you need to do something periodically in the background, use a timer or the call command with a delay parameter.
For experts only: By default, any kind of Finder item can be dropped onto a droplet. However, you can limit the acceptable types of Finder item in the same way as for any Cocoa application, namely by creating and editing a CFBundleDocumentTypes entry in the project’s Info.plist file. In the Package pane, open the Contents folder to reveal Info.plist; select it and choose Reveal in Finder from the contextual menu. You can now edit the file in any way that is convenient; the most reliable way is to use Property List Editor, which is the default if you have installed the Xcode developer tools. Documentation is here.
The rest of this document is utterly miscellaneous, just filling in some blanks with regard to features that might not be obvious.
Tab order between widgets in the same window is presently their order as elements of that window. If you want a certain text field in a window to be the first responder when that window opens, make sure it is the first element of that window.
Element order is also the same as front-to-back order. Obviously, tab order should not be tied to front-to-back order, so this will change in future. But at least for now you have some way of setting the tab order.
Persistence between runs of your application uses the Cocoa user defaults system (so, the persistent data will be stored in your application’s .plist file in the user’s Preferences). It is implemented in two ways.
First, there is a responder’s persistent data property. Its operation is completely transparent — meaning that whatever is the value of a responder’s persistent data property when your application quits will be its value the next time your application starts up — but coordinating the persistent data property with visible aspects of the interface is up to your code.
Obviously, the initialize and destroy handlers would be good places to put such code. Empty persistent data (e.g. because this is the first time your application has run on this machine, or your application has never set the persistent data for this object, or because the user threw out the .plist file, or because you changed your application’s bundle ID) has a value of missing value.
NOTE: This feature depends upon the responder being present in the IDE. If you create an object at runtime in code, you can set its
persistent dataproperty, but the next time the application runs, when that object is created again, itspersistent dataproperty will be empty. The reason, obviously, is that there is just no way to ensure that this object is the “same” as the one you created last time.
A far simpler approach is to use the checkboxes in the IDE: “persistent script” and “persistent value”.
If you check “persistent script”, then the responder’s script will be saved and restored automatically between runs of your application, so its script properties and other globals (not to mention its code) will come back to life when your app starts up exactly as they were when the app last quit.
If you check “persistent value”, then if the widget has a value property, it will be saved and restored. But the price of simplicity is that it’s simple; other appearance-related properties, such as enabled or e.g. the minimum value and maximum value of a progress indicator, are not automatically saved. So if you need that kind of power, it’s persistent data for you.
Some other specific aspects of a widget, such as a window’s frame (size and position), have their own persistence checkbox (“Remember frame”).
To test initial conditions with no existing defaults, check the application object’s “Empty defaults”.
See example: 01 Hello World. The text field has “persistent value” checked, and the window has “remember frame” checked. That’s sufficient to implement complete persistence!
See example: 02 HelloTotallyDynamic. There is no text field and no window, because they are created in code. So the text field’s value and the window’s frame are stored in application script properties at termination time, and the application has “persistent script” checked, so those script properties persist, enabling us to restore those features of the interface the next time the application runs.
See example: 28 PersistentData. Illustrates use of the
persistent dataproperty to make a popup button’s selection persist between runs.
A dialog is a window that appears in a special mode:
Either the window prevents all other activity (except for interaction with that window) while it is present, in which case it is application-modal…
or else it appears as a “sheet” attached to a window and prevents all other activity in that window (except for interaction with the sheet), in which case it is window-modal.
FS5 provides two commands for summoning a dialog: display alert and display panel. The difference is that an alert is a built-in (though somewhat customizable) dialog; a panel is simply your own window, used as a dialog. Either one can be summoned as application-modal or as window-modal.
You should not use
display dialogin a real application, as it is not the Cocoa Way. I do use it a lot in the example projects, but that’s effectively just a form of debugging.
An alert comes with some text, some buttons and an icon (and a help button), so it’s simple and standard, but deliberately limited. (But, starting in Leopard, you can insert an “accessory view” into the alert — see the discussion of loose views — so the alert can be customized with additional widgets.)
The dialog summoned by display alert is application-modal by default. Your code stops dead at the line that calls display alert (though if you have an accessory view in the alert, your code can respond to user activity within it) until the user clicks one of the alert’s standard buttons, at which point the display alert call returns an alert reply record and execution proceeds to the next line.
But if you specify the over parameter, the dialog is a sheet. In this case, no value is returned from the display alert call, and your code just continues on, even while the sheet is showing. So when the alert is dismissed, if you want to know what button the user pressed, or respond in any way to the dismissal of the dialog, you must implement an alert did end event handler. (I’ll tell you where to implement it in a moment.)
The display panel command gives you much more flexibility, because you get to use your own window as a dialog. But of course management is more complicated.
With display panel, telling the dialog to close is up to your code (or, if the alert has a close button, the user can close it). Typically you will have some buttons in the dialog window whose action event handlers will tell the dialog window to close. The close command takes an optional reason parameter, and you will probably want to take advantage of this. Otherwise, later code won’t have any way of knowing why the dialog closed (e.g. what particular button was pressed).
The dialog summoned by display panel is application-modal by default. Your code stops dead at the line that calls display panel. But your other code can still run while the dialog is up, so (for example) your panel window can contain buttons and your code can respond to their action events. At some point, as I just said, your code needs to tell the panel window to close. At that point, your code continues after the display panel call, and a value is returned. That value is the reason parameter from the close command (or missing value if no reason was supplied).
If you specify the over parameter, the dialog is a sheet. In that case — or, if the panel is application-modal, but you specify that the blocking parameter is false — then no value is returned from the display panel call, and in fact your code just continues on, even while the dialog is showing. A panel did end event is generated when the dialog closes, and you can handle this if desired.
We have seen that when a sheet display alert dialog closes, there is an alert did end event; and, when a sheet or non-blocking display panel dialog closes, there is a panel did end event. So, where do you implement alert did end or panel did end? Well, you have two choices.
If your display alert or display panel call specifies a delegate (a specific responder), then alert did end or panel did end is sent to that responder. (Note that the language for saying that the delegate is “me” is to say “my parent”; that’s because “me” is the script, which is not a responder, whereas “my parent” is the responder — even though of course the script is where the message is sent.)
If you don’t specify a delegate, then:
In the case of display alert, alert did end is sent to the window in front of which the sheet appeared the responder that issued the original display alert command.
In the case of display panel, panel did end is sent to the window that was used as a panel. (By the way, if the panel was shown as a sheet, then its delegate, by default, is the window over which the sheet appeared.)
See example: 29 Dialogs.
FS5 also overrides AppleScript’s choose folder, choose file, and choose file name commands so that they summon standard Open and Save dialogs. Accordingly, these dialogs can be made to appear as application-modal or as sheets, and each has its own corresponding event handler sent after the sheet closes (its name is the same as the command, with did end added). The rules for where this event handler is sent are similar to those for alert did end.
These overrides also give you the ability to customize the file/folder dialog by inserting an “accessory view” into it (see the discussion of loose views). Plus, you can get finer control over what Finder items are enabled in the dialog by handling the corresponding should show file event; it is sent to the same place as the did end handler.
See example: 03 PDF View. Good example of a file open dialog, acting as a sheet, limited (to PDF files), with a simple accessory view.
The AppleScript duplicate command has really cool implications for FS5. For example, there is no document architecture, but multiple copies of a window can be made easily through the duplicate command. Similarly, views can be duplicated as a way of moving them from one place to another.
See example: 30 WindowDuplication. This example shows that, even though we do not have an actual “document architecture” in place yet, FaceSpan has sufficient abilities to simulate it. Documents can be created, saved, and opened from disk. Behavior on closing a document window, or quitting, is identical to TextEdit or any other Cocoa document-based application.
See example: 31 Flying Button.
Although we are now well on the road to implementation of a fairly full-fledged table view, it is not visible in this release; instead, we have the Simple Table plug-in. What’s simple about it is that you only get one column and that column consists of just unstyled text. So it really is just a simple list view. On the other hand, it is remarkable how much you can get done with a simple list view! In many cases, that’s all you really need. Even this simple list view now has many options and a sufficient repertory of events to make it extremely handy.
See example: 12a Table. A table-based version of 12.
See example: 34 Bonjour Baby.
See example: 36 Script Runner. Shows manipulation and tracking of the table’s selection, among other things.
Quartz Composer is a really amazing and too little-known program included with Apple’s Xcode Tools, allowing users to make elaborate animations (“Quartz compositions”) without doing any text-based programming. Such animations often have “ports” that allow you to set parameters governing some of their behavior (in advance or in real time). The FS5 Quartz Composition View widget permits access to these ports from AppleScript. You can say value of input port "SomePort" of myQCView, or simply treat the port name as a property name, |SomePort| of myQCView.
See example: 32 Quartz Composition Example. Also illustrates use of a color well and a stepper.
Display of a PDF is pretty much trivial.
See example: 03 PDF View.
An HTML view can fetch and display HTML from the Internet via HTTP, or load an HTML or Web Archive file from disk, or can display text-based HTML formed in real time. HTML views are rather more useful than you might suppose, as a simple way to lay out and display any kind of text and pictures.
See example: 33 HTML View. Exercises HTML View pretty thoroughly. The example also performs some rather nifty hiding and showing of widgets, using a container view to help position them and show / hide them together.
See example: 26 Calendar Task. Uses an HTML View simply for text layout.
See example: 33a JavaScript Meets FaceSpan. Introduces a very cool and rather frightening feature of an HTML view: an HTML view’s JavaScript can call directly into FaceSpan, and FaceSpan can call directly into an HTML view’s JavaScript! This means that an HTML view can be dynamic, with the logic of that dynamism embedded in the FaceSpan code.
The Movie view is quite straightforward and simple to use.
See example: 12 Dynamic Buttons and Bag. Notice the “misuse” of a movie view as a way to play a sound file.
This responder without interface watches the local network for Bonjour services to appear or disappear.
See example: 34 BonjourBaby. Watches for iTunes shared libraries on the local network.
Toolbar items work just like menu items, really: their enablement and behavior works through an operation. Toolbar items are trivial to set up in FaceSpan’s IDE, except for one thing: if you want the toolbar to contain built-in standard items (such as the Customize Toolbar button), then you need to set that up in code for now (eventually this will be possible in the IDE as well).
See example: 03 PDF View. A trivial non-customizable toolbar, the perfect place to stick a couple of extra buttons for which there was no room in the window’s content area.
See example: 35 Toolbar. Also demonstrates use of a drawer, whose content must be populated in code for now.
A scrolling container view is FaceSpan’s implementation of scroll bars along with some content whose position they control. The geometry here can be a little confusing at first, but only because scrolling geometry is always a little confusing at first. See the dictionary for a highly illuminating discussion.
See examples: 38 JocoScroller and 39 JocoInTheBox.
See example: 40 Scroller Exploration. Exposes the values of the three elements listed above (content size, visible content frame, and frame of a widget inside the content view) so you can play with the geometry and watch the numbers change. Very educational!